High-Poly Go Cart
In an effort to continue to grow as an artist, I decided to take a stab at making a complete high poly mesh. Being a “Game Artist”, I usually look for ways to bypass this process in favor of shortcuts. Seeing how the industry is working toward more detailed meshes, it made sense to build out this skill.
Here is one of the Reference Photos I worked from.

…And here is the high-poly result.
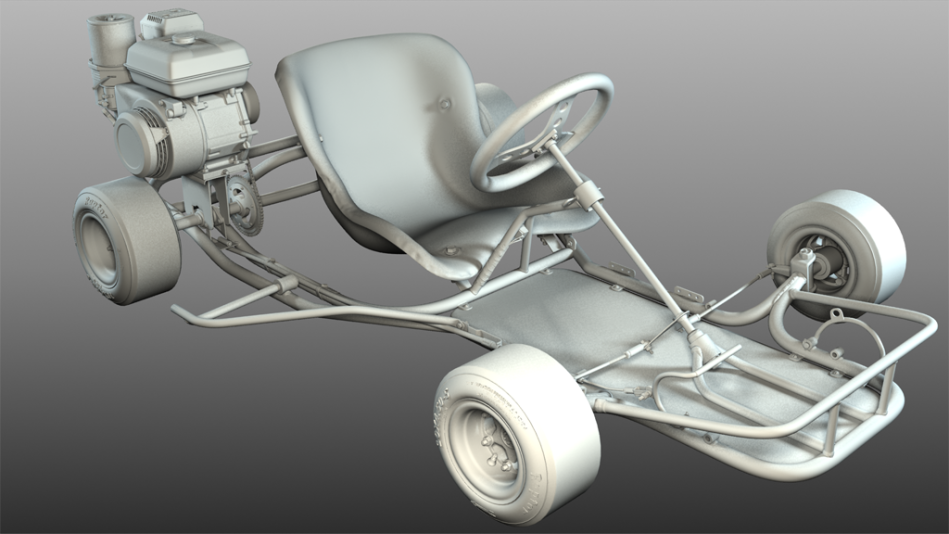

Now to get started making a low poly equivalent.
Doom 64 Mapping: A postmordem
A few weeks ago, version 2.0 of Doom64 Ex was released; a project that reversed engineered the doom 64 rom file into a playable pc game. With this release came for the first time a stable level editor to make custom maps with. Being a hardcore doom fan, I couldn’t pass up an opportunity to tinker with another version of the doom engine. After three weeks, here is what i was able to produce with little more than a level editor and a tech bible:
The Build Process
If you’ve never edited the doom engine before, you edit sectors from a top down view, setting a only floor and a ceiling height. The engine isn’t a full 3d engine, so there is no real way to make floating 3d geometry. Because this was a return to a simpler time in map making, i decided to just play with things i could draw on the grid.

Eventually i put together a few rooms with different teleporters in them and built the rest of the map around that. I liked the idea of the teleporters being used in a puzzle because it allowed the space to become re-usable instead of linear. The concept of reusable space then became the theme of the map. I could use the scripting system to make the map behave differently depending on where you had been before. Using what i have learned from my 3d modeling pipeline, i built a functional prototype of the map first of the main puzzle and added combat situations after. Finally, the map was lit with the lighting system that is unique to this doom engine.
Lighting
Initially I was drawn to editing Doom 64 because I was interested in the engines lighting system. The way this engine does its lighting is a 101 in color theory. Instead of using point lighting like modern engines, Doom 64 used sector based lighting to define the colors of an area. Each sector has a ceiling, top wall, bottom wall, floor and thing color that must be set for every sector. There was no overall lighting intensity: shadows and lights had to be created using brighter and darker colors to create the illusion of lighting intensity.

So this is where the color theory comes into play. The textures are all very grey and bland 64 x 64 patches that required good color use to make the spaces look interesting. Adobe Kuler proved to be an incredible tool for getting good color bases to start building moods.

Scripting
The scripting for this engine is also really interesting. Doom 64 uses a system called Macros which is the ability to stack multiple pre-defined line functions into a series of instructions that can execute on various conditions. These can be used to alter a sectors lighting, move things around or more creatively, copy line properties (which can also have macros embedded in them) between various sectors.

While this is definitely limited, I found that i could manipulate a level that at its start has no enemies present to build an ever-changing map that has different combat scenerios at different points in the level.
Final Thoughts
Overall, I found this project to be a good base builder for pure gameplay. Its also really cool there is still a community of people who keep the doom community alive with tools that allow for new content to be created. I really can’t stress enough how awesome the level editor is, so I’ve included a few screenshots from its 3d editing mode:


All in all it was a really fun expierence and a footnote in an idea I now have to carry my level design further into creating assets that are used in a modern engine.
Visit – Doom 64Ex homepage
Download – Doom64Ex Binaries & Level Editor
Play – The Teleport Station
Have fun.
Updated Mini Environments
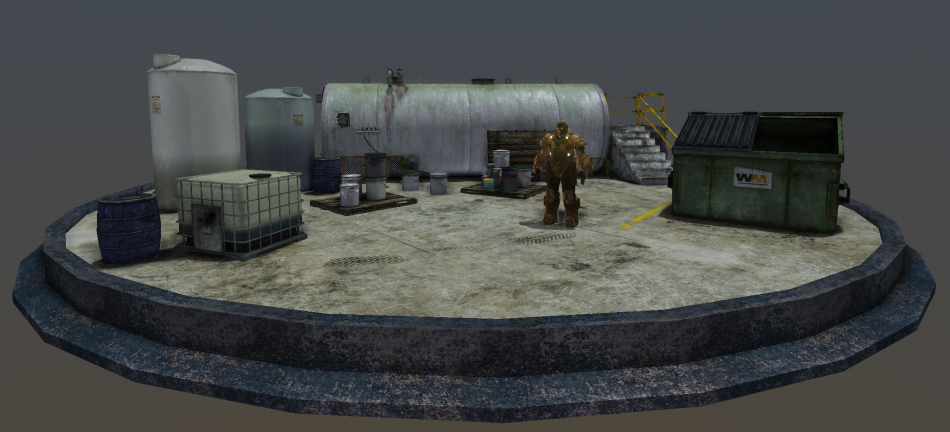
As part of a larger environment I’m building, I finished texturing two of four mini environments in order to get better texture consistency throughout the scene. The character shown here is from the Unreal Development Kit and is shown for scale purposes only.


Learning by failure
I’ve spent the past few month doing many things. I’ve moved, I’ve quit smoking, I’ve even made new years resolutions to get in shape and eat right.
Yet by far the biggest thing I’ve been doing is learning. For one, I’ve jumped from using Maya to 3D studio Max. For two, I’ve been working on high poly subdivision modeling for better normal map creation. Finally, I’ve been working on a new portfolio piece. Screenshots below, textures to follow. (I’m still learning how to correctly make those)


Borderlands Tutorials Now Available

I have to hand it to the Gearbox community in putting their efforts together in making the Borderlands Level Editor available for those who wish to build their own content to Gearbox’s hit title. As a game modder, its always kept me hooked on a game when I can build my own content for it, but I digress. The point is if your savvy enough to follow some obscure obstructions and install a custom map to access user content, you too can join the ranks of the Borderlands modding community.
Because modding means so much to me (its more or less the reason I do what I do now), I felt it important to help out the mod community by producing some video tutorials outling the basics of putting together a functioning level. For now, I’ve put together the first chapter in what I hope to be a complete borderlands editing guide. This first chapter covers the basics of getting a level up and running, including:
- Adding a Catch-A-Ride station
- Creating the player respawn tunnel FX
- Creating Auto-save and Fast travel way points
- Making a level transition
Over the next several days, I’ll be rolling out new chapters that deal with a broader range of topics. In the meantime though, Ive setup a tutorials page where these will all live. You can find these under Without further adu, enjoy the Borderlands Tutorials.
Tutorial: Setting Up Swarm for Multiple Machines
Recently I have run into situations where my MacBook Pro has taken far too long to build the lights on my UDK scene. For anyone who uses UDK, you may have seen that Swarm, Unreal’s lightmap processing tool for Lightmass, has the ability to distribute its workload across a network to other computers. When my build times got up to an hour for a preview, I decided to do some research on how to use the rest of the machines in my house to help decrease my lighting build times. However, in looking for tutorials on how to setup a swarm system came up with some confusing spots and scattered information. So here now is my own tutorial on how to setup Swarm to distribute work across the other computers in your network.
Setting Up Swarm Agent for Network Distribution
Initial Setup
First and foremost, make sure the UDK is installed on all the machines you want to use in your Swarm network. Next, pick one machine (I use the least powerful machine I have) to act as the Swarm Coordinator, which will be the centralized hub of how information gets transferred across the network. Open up your UDK folder and navigate to binaries. There you will see the following:

First, Launch SwarmCoordinator.exe. This is a simple program that shows you which computers are connected to your network that can be used for lightmap processing.
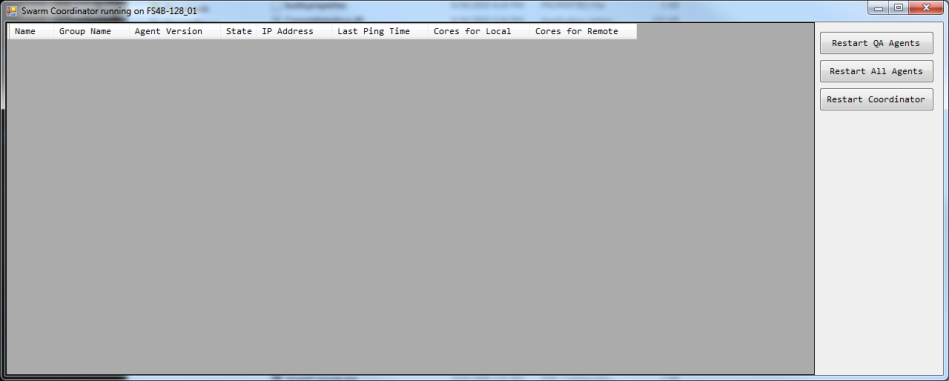
The Coordinator only has three buttons: Restart QA agents, Restart All Agents (Swarm agents on other machines) and Restart Coordinator (which clears the list of connected agents from the list so they can re-connect). Right now there is nothing connected to the computer, which is OK for now. The important thing with Swarm Coordinator is that the program should be left running for as long as your going to do your rendering. Now, lets setup Swarm Agents to connect to the coordinator. In the same binaries folder as the SwarmCoordinator.exe, launch SwarmAgent.exe.
Setting Up Swarm Agent

In the settings tab, you will notice a section called Distributed Settings. Here is a quick breakdown on what everything does:
AgentGroupName: This is the group that this agent belongs to. Other agents with this name will be used when the coordinator distributes the workload. It can be left as Default.
AllowRemoteAgentGroup: This setting determines the group of agents that this agent can use when it processes information across the network. Agent groups can be set with the above AgentGroupName. Since we want to use the group of agents we’ve specified, change the value from DefaultDeployed to Default.
AllowRemoteAgentNames: This setting is a way to specify within the group of agents we are using which in particular we would like to use. These are the computer names, and can be separated with a ‘ ; ‘ if you wish to use multiples. However, I like to use all the power I can get, so we can specify a wild card or part or all of a name in a group using a ‘ * ‘. Using * on its own will use all names in a group. Replace the default setting of RENDER* with *.
AvoidLocalExecution: This bypasses the agent that executed the job from being used for processing the lightmap information. This can be handy if you want to use your computers capabilities for other tasks while it renders the job on the other machines on the network. This only works if the machine that launches the job has this parameter set. I keep this set to False.
CoordinatorRemotingHost: This parameter is the most important. This tells swarm where to find the computer using Swarm Coordinator. This can be entered in in the form on a computer name (case sensitive) or an ip address. For a home network, I tend to lean toward computers names.
EnableStandaloneMode: This setting will omit using any of the other agents and render only using your machine. This is quick way to return to the default way that swarm processes lightmaps. I keep it set to False.
So, knowing all of this, I change my settings to the following. For this example, I’m using an IP address over a computer name.

As I do this for each computer, the swarm coordinator will begin to populate with the users.

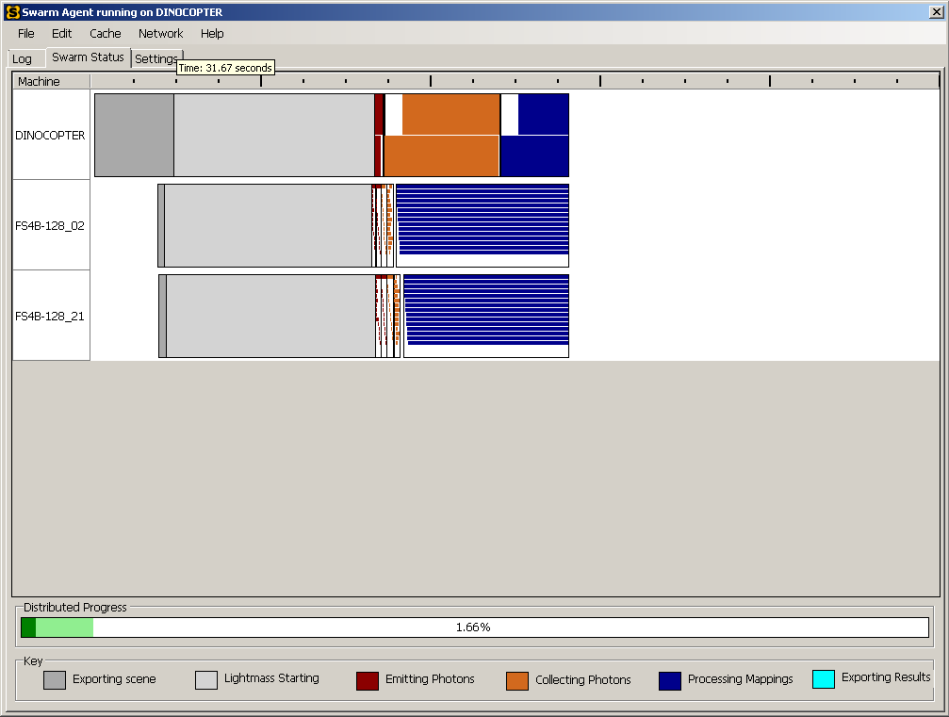
And thats pretty much it. Now when you build lights, the Swarm Coordinator will dictate how the job is spread out across the network. None of the other agents will have the colored bar in the Swarm Status tab, but their process can be monitored in the Log tab.
Finding Your IP Address
You can find your IP address quickly by opening command prompt (start -> search ->cmd) and typing ipconfig. You’ll want the number in the IPV4 address.

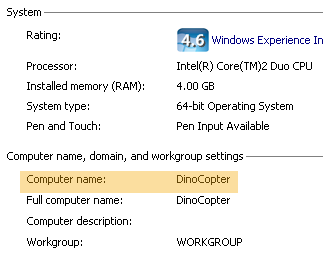
Finding Your Computer’s Name
Right click the My Computer icon and go to properties. The computer’s name is listed halfway down under computer name, domain and workgroup settings.
 Developer Settings
The developer menu allows you to control the job performance of Swarm and various other debugging settings. To enable the developer settings tap, go to DeveloperSettings -> ShowDeveloperMenu -> True. A new tab called Developer Settings.
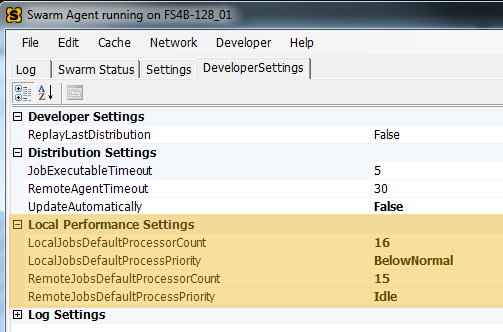
In this menu, you can tweak the way in which Swarm will use the idle parts of your machine. If your taking over co-workers or siblings computers, you can use these settings so when a job is deployed, it doesn’t affect their use of the machine. Likewise, you can also set the remote job to use more of the computers resources by setting RemoteJobDefaultProcessPriority from Idle to Above Normal.
New Dealings
Since my last update I’ve gotten sidetracked from my carnival project with several other smaller things. First and foremost, I just finished my volunteer program with SIGGRAPH. For those unfamiliar to what SIGGRAPH is, its a computer animation and game conference held every year to talk about the advancements in computer graphics in related industries. It has your usual montage of conference like things including white paper talks, an expo floor where key software companies like Autodesk and Pixar show off their technology and courses on how to make the most of upcoming technology in your computer related field. From the student volunteer program it was a blast. Mots of the students there are incredibly talented and driven and it was a breath of fresh air to get to be around so much technology and so many talented people.
So now I’m working on something else. I decided to do to my poolhall scene what I did with my lighthouse and created every last asset I ever wanted to make for a better scene. Here are some rough screenshots below.
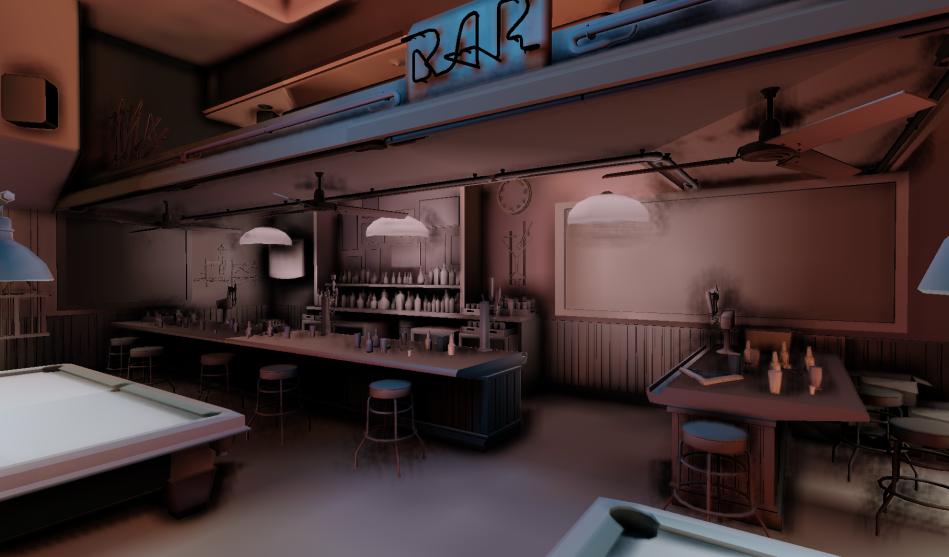

So far all the modeling and lighting are in acceptable shape. Next up: material and texture work. More screenshots to follow.
Until Next time.
Sparky
The New project
And by new I really mean old. I decided to re-do a project that I never really did complete correctly. I had built a carnival in Unreal as part of a month long project, but didn’t get a chance to make it through the construction phase correctly. 
Theres multiple problems with the scene. First and foremost is the environment this all takes place in. I had considered about a dozen different environments ranging from the desert in Nevada to the inner city streets. Regardless, there all just ideas at this stage. The actual work has gone into the rides, which have gotten a fresh perspective since their initial construction in November of 2009.
Some of the major improvements comes from a break in the mentality of how I ‘ve been modeling. Previously I had gone for poly counts; trying to keep my polycount as low as I could. While there is nothing wrong with modeling this way, I’m going in a different direction. Rather than dealing with a lot of texture cards (which can look weird), I’ve decided just to model some details in. This is on a case by case basis, but here is a good example of the changes:

So In the meantime, here are some of my newer models for this scene. Hopefully I can start making some real progress on this scene in the next month. In the meantime, enjoy the renders.
Until next time,
-Sparky
The Lost and Found Mentality
I had an experience recently where I came off of a project I didn’t like and tried to find my creative mojo in a project I wanted to do for a long time. I’ve always wanted to build a Lighthouse scene, as there is something not only majestic about the scenery in a lighthouse, but architecturally interesting too. As with all my projects, I had a bunch of new techniques I wanted to try out. I set out with pie eyed dreams of creating awesome from scratch, but what I got was a frustrating path of self-discovery and the motivation to write this article.
Here is the problem. I’m still an amateur in many regards, and as such I’m still in the mentality of “Try anything once”. This is a good and bad thing, as the open minded mentality keeps me in the current loop of art and pipeline techniques. The big con is the good techniques I abandon to try new ones, not even aware that they where good techniques in the first place. Under casual situations this is fine, but I did this under a deadline which was bad idea # 1.
So in this lighthouse scene I decided on a few things. I wanted to use repeated texture space so I only had to make a few base textures, and I wanted to create all my textures from scratch in zbrush. On top of that, what would be the harm in trying out vertex painting? I herd that was all the rage in the Unreal engine these days.
In retrospect, I should have sat myself down and said “This ventures too much into unfamiliar territory, scale back.” But being the headstrong guy I am I saw absolutely nothing wrong with any of the above pipeline ideas and began drawing out plans for a month long project that used all these new ideas.
This was the result I got:
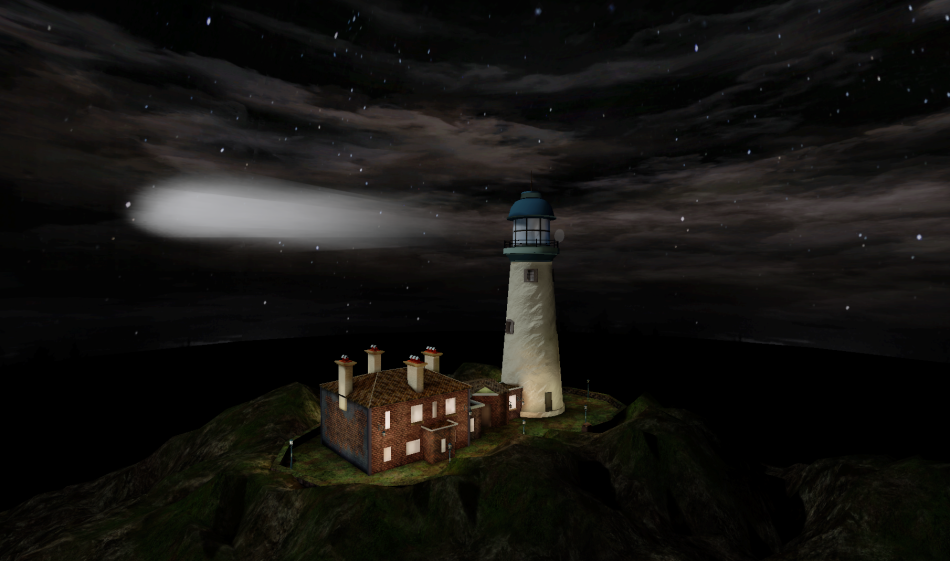
So what went wrong? Here are my top things I found.
Approaching new techniques as if the old ones never existed. This was a weird problem I had because I figured Zbrush would produce better results than photo textures. As a result, when i needed a throw away texture I’d try to make it in zbrush, even though photo sourcing would have been quicker.
Having no backup plan when things got bad. I very quickly fell behind my deadline, and still pressed forward with my original goals. Like an addict in denial, I figured I’d come up with a miracle solution at the 11th hour. That miracle never happened.
Forgetting the cardinal rules of modeling. This was a dumb rule to forget. For those who don’t know, you model general to specific, big pieces to small pieces. I got so enamored with my own personal goals, I did this step backwards. This left me with a very poorly constructed scene.
Building for results instead of proof of concept. This is perhaps the most important step of all. I struggled to get vertex painting working correctly so when I did, I wrote it off as a success instead of building it into something that could make it professional like.
Taking all these lessons into account, I attempted to re-build my scene with all the techniques learned and came up with drastically different results.
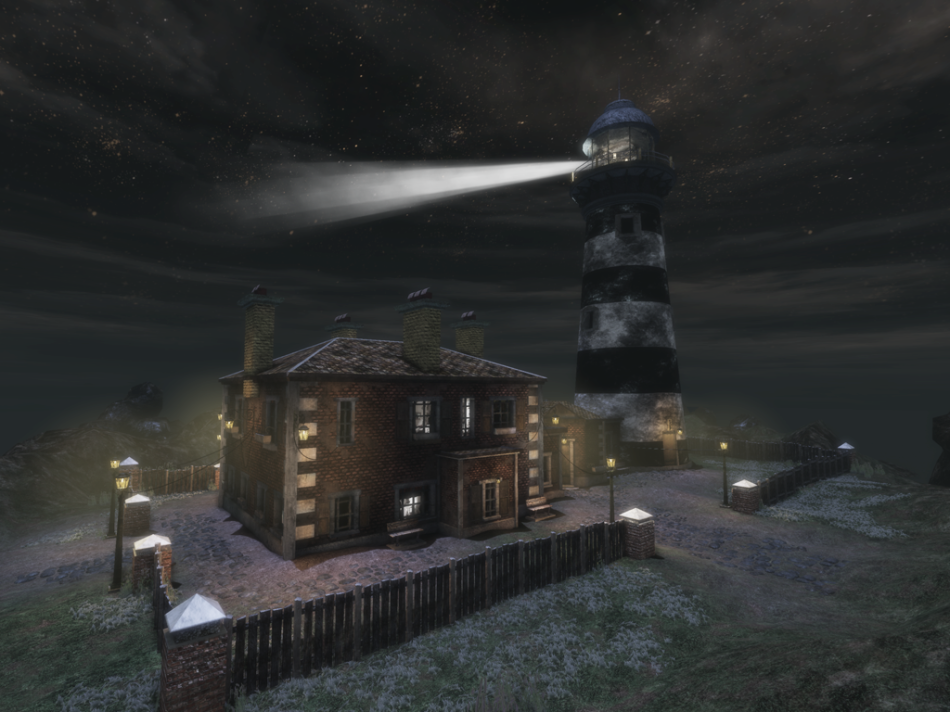
So whats the moral of the story? Well, obviously I can’t build every scene twice to get the best results, so its a fact of awareness of the success of something as its happening. Someone who’s mentality is lost wont realize there lost until they see the results of their labors land them in a different ballpark of their envisioned idea. A found mentality will increase the awareness of the process in their workflow and the success or failures it is going to produce. Through better situational awareness such as this, I take one step closer to the professional I am seeking to be and abandon the short sighted judgments of an amateur.
Until next time,
-Sparky

